Showing posts with label Nails. Show all posts

Monday, 19 August 2013

Ciaté Caviar Manicure - Mother of Pearl


Ciaté Caviar Manicure in Mother of Pearl 


Monday means Nails! Today I want to share a little something special as far as nails are concerned – Ciaté Caviar Manicure in Mother of Peal. This is a really delicate looking manicure that can be worn for a special occasion or simply on the ring ringer. Priced at approximately €22 it is on the high end of the price scale but it is as I mentioned rather special.


This is a three dimensional manicure, it has shine and gloss and can looks more like a salon manicure then a home job.
 Each pack contains
  • ·         13.5ml - Snow Virgin Nail Polish
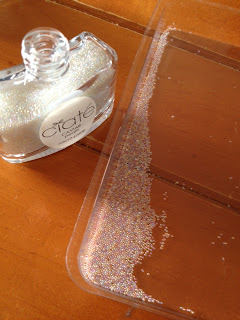
  • ·         20g - Holographic Caviar Pearls
  • ·         A little funnel
  • ·         Instruction leaflet


The process of application is actually really simple compared to what I thought it would be. 
The steps included;

Step 1
Clean your nails – using an acetone free nail polish remover, remove all polish. I use acetone free just because it is gentler on the nails. Wash your hands.

Step 2
Paint one coat of the Snow Virgin Nail Polish on each nail. One of the things I like about the sets offered by Ciate is that the nail polishes which come with the sets are all beautiful individually. They are rich and strong wearing meaning you can easily wear them on their own. One each nail is polished leave to dry for a few minutes. This polish in particular is really nice. I find it so difficult to find a nice white nail polish and this one is by the best I have found.

Step 3
This step needs to be completed nail by nail. Place the plastic tray which comes as part of the packaging under your hand (the hand that you intend to paint the nails). Paint one nail. Take the Holographic Caviar Pearls pot and gently tip the pearls on to the nails ensuring the excess pearls fall into the plastic tray. Do this for each individual nail – paint and pearl, paint and pearl!


Step 4
All the excess pearls will now be in the plastic tray. Place the funnel in the pot containing and pearls and pour the excess from the tray back in to pot and hey presto no waste!!


Step 5
Paint each nail with a fast drying strong top coat. I think this helps the pearls to set better and ensure your manicure will last longer.


That’s it! Your Mother of Pearl Caviar Manicure is complete. I find that by using the top coat (I am a big fan of Seche Vite fast drying top coat) the manicure really does last and less pearls fall off. I really like this manicure, the pearls tend to pick the light or colours around them so they are glossy and shiny.


Please excuse my little chubby fingers - my sister likes to tell me they resemble a sausage.
There are a number of alternatives to this set offered by ciate, for example both Top Shop and River Island offer a similar product – CLICK HERE 
 – I have tried the river island version which was good but did not have great staying power.

So there you have it, Mondays Nails. I really hope you enjoyed this post and if you have tried or intend to try this manicure or a similar manicure please leave a comment below telling me your thought.

Hope you have a good week


P.S COMPETITION TIME STILL RUNNING CLICK HERE

Xoxo


Monday, 12 August 2013

Mondays Nails = Nail Wraps .......How To !

Nail Wraps ...............How To! 


Attempting to stick to my goal of dedicating Mondays to all thing nails I wanna share my experience of attempting to apply nail wraps. 


I have always been a little dubious of Nail Wraps. They just seemed a little fiddlie or complicated to me. In my pursuit of attempting to try new beauty trends I decided to bit the bullet and have a go! 

I came across these flower design nail wraps in my local Dealz store ( similar to a cut price store) and thought for the price of €1.49 they were not too expensive if I made a complete mess of applying them. Pink roses on a chocolate brown background seemed like a pretty design so my adventure began ! 

I began by ensuring there was no old nail polish on my nails by cleaning each nail with a little nail polish remover. 

I then filed each nail to keep the shape I like and buffed each nail
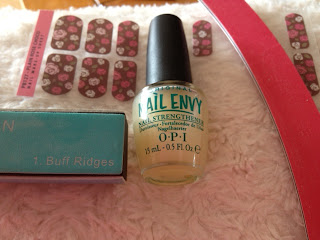
Using a buffer by Layton Denny. I like this buffer as it has 4 sides in a block that allows you to file, buff as polish each nail. I finished my preparation by applying one coat of OPI Nail Envy. I find this product by OPI an excellent tool to strengthen my nails and keep them in over all goo condition. 


Next I decided on which nail wrap size matched each nail. Only need to do this for one hand as there are 2 wraps for each size 


Once you have the correct size carefully remove the wrap place the rounded end towards your cuticle gentle lay the wrap along the nail. Using your finger or the flat end if a cuticle stick run it along the nail just to flatten the nail wrap and remove any bubbles. Pinch the ends like shown. This just makes the next step easier! 


Using a nail file gently file the nail warp at the edge of your nail. This will remove the excess nail wrap. Once removed just file gently to achieve the desired shape.  That's it! The whole process is much easier then I had envisioned. So much so I have purchased more nail wraps and will defiantly be using them more often! Have you tried nail wraps ? If so do you like them? Please leave a comment with any recommendations you may have. 


Xoxo 

Saturday, 6 April 2013


VELVET MANICURE BY CIATE 


I love nail, I love nail polish/varnish, I love nail art and I love manicures!! So as a way of sharing this love I have decided to dedicate one post a week to an all things nails. I have completed a few post on nails which I you can have a look at by clicking HERE   ......


So to begin, I just want to add at this point I am not an expert on nails, it is a simple  love trying new nail trends and I get super excited with a new style, art idea or trend is introduced. This excitement raised its giddy little head when I saw the The Velvet Manicure Set in Mink Cashmere by Ciate. Velvet Manicure 

This manicure set is focused on the theme of luxury and texture. In this kit you receive a bottle of polish; in this case the shade is cashmere mink, a bottle of crushed velvet powder in a corresponding colour and a little brush to aid in the application process. This kit was super easy to use and the whole process is really fast.


·         Clean off any excess polish and ensure the nails are oil free.

·         Assuming the nails are in you desired shape apply a base coat – I really like OPI Nail Envy as it nourishes the nail as supplies a base coat.

·         Open your kit and line up your bottles! Apply one coat of the nail polish to each nail and allow drying.

·          Take one nail at a time and apply another coat of the nail polish. Then on the same nail sprinkle the crushed velvet powder onto the nail. Apply as much as you like of the powder depending on how much definite you want the texture on the nail. Continue nail by nail all the time being mindful that your nails are drying and setting.

·         When powder is applied to all nails use the little brush to sweep away all excess powder.

·         Hey presto! You now have a velvet manicure!!!!

*Please excuse my little chubby fingers in the photo's I have rather small fingers but are little chubby too. They remind me of my Mum's hands so I don't mind all that much (",) 

A really great positive of using this manicure kit is that it dries really fast and sets even faster. It is also strong. My nails did not chip at all in the 5 days that I had it on. Despite this the texture was really easy to remove with nail polish remover which is unusual for specialised manicures – I often find them really difficult to remove.
The only negative aspect of using this kit was that I was not 100% in love with the colour as the time went on as it became a little darker. This however was simply a matter of taste. Ciate in general offer very high quality nail products and  I found this kit to be no different.

Over all I enjoyed using this kit and think that the texture really does fulfill its ambition of being luxurious and velvet. I would like to try another colour in this range.

What do you think of the velvet texture for your nails? What have you been doing lately with your nails .......? Please leave a comment and share as I love to read them. 

Xoxo 

Tuesday, 5 March 2013

An Easy Way To Remove Long Wear Nail Polish

The Easy Way To Remove Long Lasting Manicure
--------------------
I seem to be doing a lot of posts on nails lately so here is a quick n easy way to remove nail polish be it regular or long ware.

1. Cut up regular cotton pads big enough to wrap around the nail.

2. Cut up regular kitchen foil a little bigger so to wrap around the finger.

3. Pour nail polish remover on to cotton pad. I like this remover by essence it's effective, inexpensive and gentle on nails.

4. Place the cotton pad on the nail and then wrap the tin foil around the pad n nail. Do the same for all fingers ...... I always need a helping hand to do my second hand! Leave for approximately 10mins.

5. Remove the foil n cotton. The polish will appear crumbly. Take a wooden cuticle stick and using the glad end gently push/scrap the polish off. It should be extremely easy to remove polish. If this is not the case replace cotton n foil n wait a few more minutes.

6. Wash hands, file nails , treat cuticle and moisturise hands and your good to go with the next nail creation!!


Hope u found this post helpful. Do u have any tricks and tips you would like to share please leave a comment below.

Xoxo


Monday, 11 February 2013

Bling it on Leather and Skulls from Nails Inc


Bling It on Black Leather and Skulls
By Nails Inc 

When I saw this polish and embellishment kit being introduced by Nails Inc (who happen to be my favourite nail brand) I simply had to have it. In the days following its release it sold out almost immediately so I had to wait a couple of weeks as I don’t live near a stockist.

OH ...how worth the wait. The concept behind the leather is inspired by the spring summer 2013 fashion trends for leather and texture. It is fresh, new and incorporates lots of element of the nail art trends that can be seen so widely.

The complete collection consists of 

vBling it on Black Leather and Skulls – black leather effect polish with sliver skull embellishments

v Bling it on Rebel – Mulberry Red Polish with sliver skull embellishments, stormy coloutred Swarovski crystals and studs. ------I want this !!!

v Bling it on Tan Leather and Skulls – tan leather effect polish with gold skull embellishments
With all 3 options comes nail glue and application stick. 

My experience of the Bling it on Black Leather and Skulls was really exciting. As strange as it may seem exciting is a good way to describe it. The polish goes on glossy and clean. Then the exciting part................as the polish dries it really does start to look a lot like leather. It took me 2 even coats to get my desired consistency. Once it had dried it does really look more and more like leather and it has a very different texture and feel. It has a somewhat of a matt finish and feels uneven to the touch. You get 4 sliver skulls with the pack, nail glue and an applicator stick. It is extremely easy to pop on the skull embellishment. One great advantage of this kit is that the polish has a really good staying power. I had no chips for 4 to 5 days, I think in the end I only took off the polish as I fancied a change of colour rather than it being a must do to shappy appearance or chips. 


Overall I like this polish. I would love to try the other colours in particular the mulberry as I like deep red shades and the embellishments that come with the kit are a little more me then skulls. Also as can be seen from the photograph i have short fingers and smallish nails so the skulls kind of took over the whole nail, but then again this is just me. Priced at €24 or £19 it is rather on the expensive side but a definite treat for yourself.

Recently launched  is the Bling It On Romance. This little set is now proudly perched at the top of my nail wish list. 


What is your favourite nail trend at the moment? Please let me know by leaving a comment below.


Xoxo

Wednesday, 26 December 2012

Pretty Pretty Nails

Nails of Skulls and Sparkles 


What is it about having your nails just done. Your hands magically become the most fashionable accessory for miles around not the stumpy little sausage fingers they were about half an hour ago - ok I won't tar us all with the same brush it's only my fingers that resemble a sausage!!!

Anyway, I'm sure that the majority of beauties out there love a good old file and polish but what about the extra bonus of a fabulous eye popping colour polish. At the moment many fashionista's are loving a splash of nail art. I myself think it's just fabulous. One point I would make in relation to nail art is, like so many things in life, less is definitely more. With nails a bright and bold colour if you proceed to add nail art to every nail we run the risk of entering tacky town and all our good intentions of glam are gone. I don't claim to call myself a nail expert  I just love my nails done. Like many of us I can't afford to spoil myself to a professional nail treatment very often so I have picked up a few tricks about application and products I like to use. Keeping this in mind I have listed below a few of my top tips for achieving a fabulous nail look today.
Hope you enjoy. Any questions or comments please feel free. I will leave links to all products

1. Before you touch your nails with polish make sure your nails are clean and polish free.
Use a good moisturizing nail varnish remover to ensure all old polish is off. I like
Cutex Nourishing Nail Polish Remover. Wash your hands with a nice hand wash and leave to dry for a few minutes. 

2. File your nails to the shape you like. At the moment I am loving a nice short rounded nail. I would always suggest investing in a glass nail file. Glass nail files last literally forever!!! Once you get used to using the glass nail file its so easy, does not damage your nails at all and actually assists nail growth as the nail is not broken. 
I use the Nails Inc Glass file. 

3. Use a good base coat. this step is essential for a number of reasons. Firstly, if you are going to use a coloured polish it will stain your natural nail if you don't use a base coat. Even the high end polishes will stain, in my experience these polishes will actually stain a little more as they have excellent pigment. The second reason is to ensure your nail is being nourished. Nail polish will cover your natural nail and will not be exposed to air. As you want your nail to grow and remain strong use a good base coat. At the moment I like Nails Inc Caviar Base Coat. Its light and dries easy. Leave to dry. 

4. Apply your polish. Depending on the polish two coats are generally need to achieve a deep colour. 
Ensure there is not a large amount of polish on your brush as it will end up clumpy and if it does dry it will take ages.

5. Apply some nail art if you please !!  This is were the fun starts. You can apply art using a stamper, stencils sets or if your on the artistic side you can try your hand a free hand drawing.  You can also use gems and stones, litter pots or embellishments like skull heads as seen in Nails Inc new collection ( as you have probably guessed I <3 Nails Inc ). I like the nails sets by Essence as they are effective and cheap. I buy mine in Pennys/Primark.
If you are applying embellishments you may need a good nail glue if it does not come with your nail art sets - just keep this in mind. I use a simple wooden cuticle stick to dip in the glue and attach the embellishment. 


6. When your nails are dry and your art is completed apply a good top coat. Your top coat should be strong enough to set your nails and protect to ensure you wont have chips or nips on your precious nail work. After trying many many top coats for nails and cursing them an hour later when my nails chipped I have found what I think is the best top coat in Sally Hensen Miracle Nail Growth. This is promoted as a nail treatment and can be used as base or top. I find that it leaves your nails strong and sets them perfectly. They should last approx 5 days. Its a top buy for your nails in my book. 

****** So there you go !! My top tips for your nails and nail art Have a look at few examples of my creations. 


 Hope you enjoyed this post and you have lots and lots of fun trying it out your self. Any comments please leave them or mail me. All the links to products are below 

J xoxo 


LINKS TO PRODUCTS 


  • ·        Cutex Nourishing Nail Polish Remover


  • ·        Nail file


  • ·        Essence Nail Art


  • ·        Nails Inc Skulls Nail Art


  • ·        Cuticle Sticks


  • ·        Nail Glue


  • Sally Hensen Miracle Nail Growth 
 http://www.boots.com/en/Sally-Hansen-Miracle-Nail-Growth_20817