Showing posts with label Nail Art. Show all posts

Monday, 9 September 2013

Nail Art Pens by Barry M

Nail Art Pens by Barry M 


Returning to Monday being Nail Day this week I am going to review Nail Art Pens - one type in particular.

Nail Art is so on trend at the minute, in addition to this nail art is really pretty. It is a great way to pick up any manicure and make it really special. If you are like me and not the most artistic of nail art lovers these little offerings from Barry M are truly a “Great Little Find”.


These nail art pens come in four different colors – black, white, pink and sliver – key colors for any little design your heart may desire.
Each nail art pen has an extra fine tip which makes it really easy to draw detail or small shapes and is really useful if you have a small nail bed like me. Each pen also has an easy grip bottle means you can design with ease and you can control the amount of colour that comes out. Simply shake the bottle well before use and pump the tip until the colour starts to flow.


The polish inside the pen’s dry really fast also. One really handy tip that I have found is that if you are using the pens on a nail that is polished already apply a fast drying top coat before you apply the nail art pen. This will ensure that there are no smudges or colours running into each other.

I have used a few nail art pens and I can honestly say this is by far the best I have used for staying power, precision and vibrancy of colour. Priced at approximately €6.25 they are good a good buy.


If you use nail art pens what type do you use and how do you find them? If you try any designs please share a pic with me. I love to try new designs.

Xoxo


Monday, 12 August 2013

Mondays Nails = Nail Wraps .......How To !

Nail Wraps ...............How To! 


Attempting to stick to my goal of dedicating Mondays to all thing nails I wanna share my experience of attempting to apply nail wraps. 


I have always been a little dubious of Nail Wraps. They just seemed a little fiddlie or complicated to me. In my pursuit of attempting to try new beauty trends I decided to bit the bullet and have a go! 

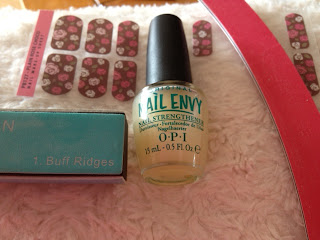
I came across these flower design nail wraps in my local Dealz store ( similar to a cut price store) and thought for the price of €1.49 they were not too expensive if I made a complete mess of applying them. Pink roses on a chocolate brown background seemed like a pretty design so my adventure began ! 

I began by ensuring there was no old nail polish on my nails by cleaning each nail with a little nail polish remover. 

I then filed each nail to keep the shape I like and buffed each nail
Using a buffer by Layton Denny. I like this buffer as it has 4 sides in a block that allows you to file, buff as polish each nail. I finished my preparation by applying one coat of OPI Nail Envy. I find this product by OPI an excellent tool to strengthen my nails and keep them in over all goo condition. 


Next I decided on which nail wrap size matched each nail. Only need to do this for one hand as there are 2 wraps for each size 


Once you have the correct size carefully remove the wrap place the rounded end towards your cuticle gentle lay the wrap along the nail. Using your finger or the flat end if a cuticle stick run it along the nail just to flatten the nail wrap and remove any bubbles. Pinch the ends like shown. This just makes the next step easier! 


Using a nail file gently file the nail warp at the edge of your nail. This will remove the excess nail wrap. Once removed just file gently to achieve the desired shape.  That's it! The whole process is much easier then I had envisioned. So much so I have purchased more nail wraps and will defiantly be using them more often! Have you tried nail wraps ? If so do you like them? Please leave a comment with any recommendations you may have. 


Xoxo 

Wednesday, 26 December 2012

Pretty Pretty Nails

Nails of Skulls and Sparkles 


What is it about having your nails just done. Your hands magically become the most fashionable accessory for miles around not the stumpy little sausage fingers they were about half an hour ago - ok I won't tar us all with the same brush it's only my fingers that resemble a sausage!!!

Anyway, I'm sure that the majority of beauties out there love a good old file and polish but what about the extra bonus of a fabulous eye popping colour polish. At the moment many fashionista's are loving a splash of nail art. I myself think it's just fabulous. One point I would make in relation to nail art is, like so many things in life, less is definitely more. With nails a bright and bold colour if you proceed to add nail art to every nail we run the risk of entering tacky town and all our good intentions of glam are gone. I don't claim to call myself a nail expert  I just love my nails done. Like many of us I can't afford to spoil myself to a professional nail treatment very often so I have picked up a few tricks about application and products I like to use. Keeping this in mind I have listed below a few of my top tips for achieving a fabulous nail look today.
Hope you enjoy. Any questions or comments please feel free. I will leave links to all products

1. Before you touch your nails with polish make sure your nails are clean and polish free.
Use a good moisturizing nail varnish remover to ensure all old polish is off. I like
Cutex Nourishing Nail Polish Remover. Wash your hands with a nice hand wash and leave to dry for a few minutes. 

2. File your nails to the shape you like. At the moment I am loving a nice short rounded nail. I would always suggest investing in a glass nail file. Glass nail files last literally forever!!! Once you get used to using the glass nail file its so easy, does not damage your nails at all and actually assists nail growth as the nail is not broken. 
I use the Nails Inc Glass file. 

3. Use a good base coat. this step is essential for a number of reasons. Firstly, if you are going to use a coloured polish it will stain your natural nail if you don't use a base coat. Even the high end polishes will stain, in my experience these polishes will actually stain a little more as they have excellent pigment. The second reason is to ensure your nail is being nourished. Nail polish will cover your natural nail and will not be exposed to air. As you want your nail to grow and remain strong use a good base coat. At the moment I like Nails Inc Caviar Base Coat. Its light and dries easy. Leave to dry. 

4. Apply your polish. Depending on the polish two coats are generally need to achieve a deep colour. 
Ensure there is not a large amount of polish on your brush as it will end up clumpy and if it does dry it will take ages.

5. Apply some nail art if you please !!  This is were the fun starts. You can apply art using a stamper, stencils sets or if your on the artistic side you can try your hand a free hand drawing.  You can also use gems and stones, litter pots or embellishments like skull heads as seen in Nails Inc new collection ( as you have probably guessed I <3 Nails Inc ). I like the nails sets by Essence as they are effective and cheap. I buy mine in Pennys/Primark.
If you are applying embellishments you may need a good nail glue if it does not come with your nail art sets - just keep this in mind. I use a simple wooden cuticle stick to dip in the glue and attach the embellishment. 


6. When your nails are dry and your art is completed apply a good top coat. Your top coat should be strong enough to set your nails and protect to ensure you wont have chips or nips on your precious nail work. After trying many many top coats for nails and cursing them an hour later when my nails chipped I have found what I think is the best top coat in Sally Hensen Miracle Nail Growth. This is promoted as a nail treatment and can be used as base or top. I find that it leaves your nails strong and sets them perfectly. They should last approx 5 days. Its a top buy for your nails in my book. 

****** So there you go !! My top tips for your nails and nail art Have a look at few examples of my creations. 


 Hope you enjoyed this post and you have lots and lots of fun trying it out your self. Any comments please leave them or mail me. All the links to products are below 

J xoxo 


LINKS TO PRODUCTS 


  • ·        Cutex Nourishing Nail Polish Remover


  • ·        Nail file


  • ·        Essence Nail Art


  • ·        Nails Inc Skulls Nail Art


  • ·        Cuticle Sticks


  • ·        Nail Glue


  • Sally Hensen Miracle Nail Growth 
 http://www.boots.com/en/Sally-Hansen-Miracle-Nail-Growth_20817